I installed Unbound. Bye, Cloudflare
In this blog, I will be talking about how to install Unbound. Like my previous blog, the audience of this entry is myself. So, consider this more as a documentation than a tutorial.
Unbound is a recursive DNS resolver. It is imperative to first understand what a DNS is before diving into what a recursive DNS is or what it does. DNS is the yellow pages of the Internet. It translates a domain like www.wikipedia.org to an IP address like 208.80.154.224. The way Pi hole works is like the way your groupmate in highschool that forwards his work to someone else. In this case, it is an external DNS server (remember Quad9 from previous blog? That).
When you type a website address (say, wikipedia.org) on your search bar, your DNS server (Quad9, Cloudflare, Google etc) will ask one of the root DNS servers.
‘Who handles .org?’ → ‘Where is wikipedia.org?’ → Get the final IP for wikipedia.org
This suggests that your browsing history is known to that DNS server (Quad9, Cloudflare, Google etc). There’s a huge debate there as most of them claim they don’t keep logs. But it falls back on who do you trust.
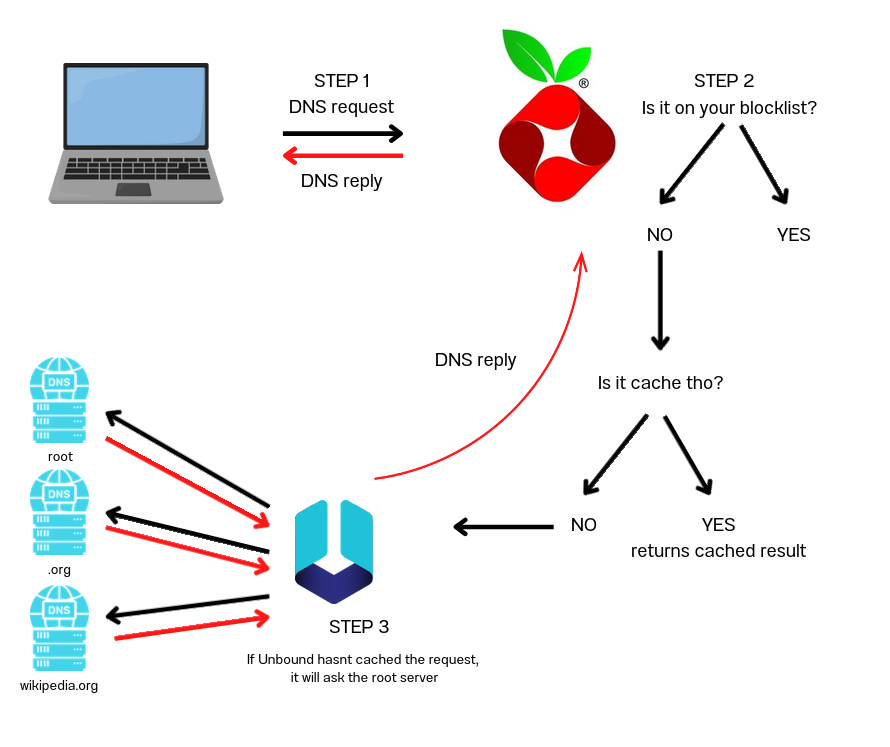
And this is where Unbound comes into the picture. It moves away the middle man and handles the entire DNS resolution process itself. It directly queries the root servers, then follows the chain to the authoritative servers to get the answer. Here’s a very simplistic diagram I made

Now, it's INSTALLATION TIME! We will start by updating the system first.
sudo apt update && sudo apt install unbound
Then, its time to configure unbound though the pi-hole.conf.You can sudo nano -w /etc/unbound/unbound.conf.d/pi-hole.conf to open the file. You can also do this via VS code, which is easier. Once inside the file, you have to copy this chunk of codes below. You can also find them here
    # If no logfile is specified, syslog is used
    # logfile: "/var/log/unbound/unbound.log"
    verbosity: 0

    interface: 127.0.0.1
    port: 5335
    do-ip4: yes
    do-udp: yes
    do-tcp: yes

    # May be set to yes if you have IPv6 connectivity
    do-ip6: no

    # You want to leave this to no unless you have *native* IPv6. With 6to4 and
    # Terredo tunnels your web browser should favor IPv4 for the same reasons
    prefer-ip6: no

    # Use this only when you downloaded the list of primary root servers!
    # If you use the default dns-root-data package, unbound will find it automatically
    #root-hints: "/var/lib/unbound/root.hints"

    # Trust glue only if it is within the server's authority
    harden-glue: yes

    # Require DNSSEC data for trust-anchored zones, if such data is absent, the zone becomes BOGUS
    harden-dnssec-stripped: yes

    # Don't use Capitalization randomization as it known to cause DNSSEC issues sometimes
    # see https://discourse.pi-hole.net/t/unbound-stubby-or-dnscrypt-proxy/9378 for further details
    use-caps-for-id: no

    # Reduce EDNS reassembly buffer size.
    # IP fragmentation is unreliable on the Internet today, and can cause
    # transmission failures when large DNS messages are sent via UDP. Even
    # when fragmentation does work, it may not be secure; it is theoretically
    # possible to spoof parts of a fragmented DNS message, without easy
    # detection at the receiving end. Recently, there was an excellent study
    # >>> Defragmenting DNS - Determining the optimal maximum UDP response size for DNS <<<
    # by Axel Koolhaas, and Tjeerd Slokker (https://indico.dns-oarc.net/event/36/contributions/776/)
    # in collaboration with NLnet Labs explored DNS using real world data from the
    # the RIPE Atlas probes and the researchers suggested different values for
    # IPv4 and IPv6 and in different scenarios. They advise that servers should
    # be configured to limit DNS messages sent over UDP to a size that will not
    # trigger fragmentation on typical network links. DNS servers can switch
    # from UDP to TCP when a DNS response is too big to fit in this limited
    # buffer size. This value has also been suggested in DNS Flag Day 2020.
    edns-buffer-size: 1232

    # Perform prefetching of close to expired message cache entries
    # This only applies to domains that have been frequently queried
    prefetch: yes

    # One thread should be sufficient, can be increased on beefy machines. In reality for most users running on small networks or on a single machine, it should be unnecessary to seek performance enhancement by increasing num-threads above 1.
    num-threads: 1

    # Ensure kernel buffer is large enough to not lose messages in traffic spikes
    so-rcvbuf: 1m

    # Ensure privacy of local IP ranges
    private-address: 192.168.0.0/16
    private-address: 169.254.0.0/16
    private-address: 172.16.0.0/12
    private-address: 10.0.0.0/8
    private-address: fd00::/8
    private-address: fe80::/10
The run the following commands to start Unbound.
sudo service unbound restart
Now, to test if Unbound is working, you can test it via the command:
dig wikipedia.org @127.0.0.1 -p 5335
Let's scrutinise this command a bit further. dig is a command to perform DNS queries. So, you're basically querying wikipedia.org and you're asking your DNS resolver for the answer. The -p 5335 specifies which port should the DNS resolver listen. So, instead of 53, which is the default, it is now 5335.
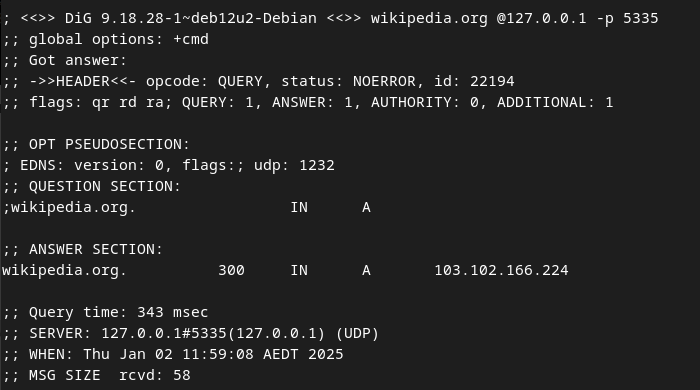
Here’s what that command gave me. You can see that in the fourth line it says NOERROR

It looks daunting at first, but the results tell you alot. Take a look at this
;; ->>HEADER<<- opcode: QUERY, status: NOERROR, id: 22194
;; flags: qr rd ra; QUERY: 1, ANSWER: 1, AUTHORITY: 0, ADDITIONAL: 1
So opcode: QUERY: tells us that what we did was a standard DNS query. status: NOERROR: says that it was successful, and that the resolver found an answer. Now, we go to AUTHORITY: 0: No authoritative nameserver information was included in this response. What does this mean? AUTHORITY: 0 means that our local DNS resolver (Unbound) already did the hard work of finding the answer by talking to the root and authoritative servers behind the scenes. So there’s no need to pass on any extra details about where to look further. Basically, it's telling you it worked.
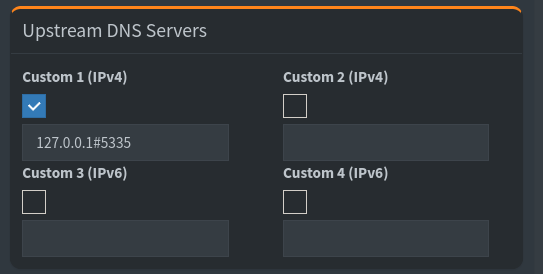
Now, it’s time to use Unbound with pihole. Sign in again to your pihole Web GUI (the one with the /admin in the end of the URL). Go to
Settings → DNS → Upstream DNS → Unclick Quad9 (or whatever you clicked before)
and put this in the custom field

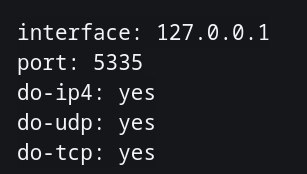
You may ask, but where ju get that 127.0.0.1#5335. It's here in the pi-hole.conf

And that's it.
Acta est fabula.